This feature is only available to the PRO license holders.
Since version 2.9, CintaNotes can protect your sensitive data and encrypt notebooks using the industry acclaimed AES-256 algorithm. The notebook will always remain encrypted on disk and will only be decrypted into memory when you enter the password.
Currently the password protection feature works with whole notebooks only. It is not possible to encrypt only some notes in a notebook.
Setting the Password
To set the password for the current notebook, select the File / Password Protection command in the main menu. The following window will appear:
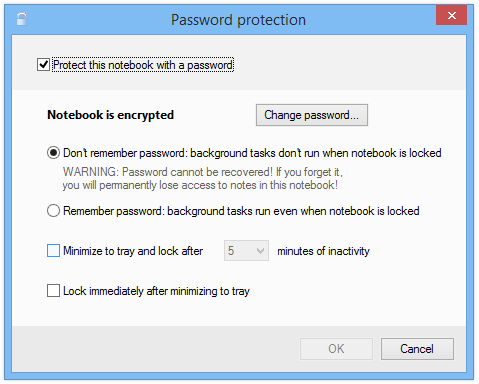
Activate the Protect this notebook with a password checkbox and enter the desired password into the New password and Confirm password fields (you need to enter the password twice to minimize the risk of a typo).
The controls below this allow you to configure password options, and we’ll examine them in a later section.
Press OK and CintaNotes will report progress as it is encrypting the notebook.
After the password is set, any access to the notebook when it is locked (more on this in a later section) will require entering the password like this:
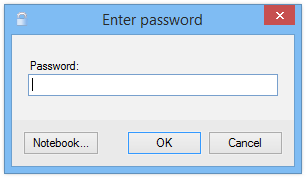
Note that instead of entering the password, you can press Cancel to minimize CintaNotes back to the tray (in case you activated it by mistake, for example). You can also click on the Notebook… button to open another notebook.
Password Options
Now let’s take a look at which options are available for password-protected notebooks.
The radio buttons Don’t remember the password and Remember the password allow you to choose between maximum security and convenience.
By default CintaNotes will only keep the password in RAM and won’t store it on disk. This means that the password is unrecoverable – if you forget the password, you lose access to your notes.
This mode is the most secure option and should be preferred for the most sensitive data. However, it can be somewhat inconvenient at times, because all background operations like cloud syncing and backup will not run until the password is entered and the notebook is unlocked – at least once after the application is started.
If convenience is more important to you than security, though, you can choose the option to remember the password. In this case CintaNotes will store the encrypted password hash on disk and will be able to run all background services even before you enter the password for the first time.
If you have portable CintaNotes in a Dropbox (or other cloud-synced) folder, always use the “Don’t remember password option”, otherwise your password could be cracked remotely!
On the positive side, when the option to remember the password is active, it is possible to reset a forgotten password and reclaim access to your notes with the help of CintaNotes tech support.
The Lock and minimize to tray after X minutes of inactivity controls the timeout after which you’ll need to re-enter the password. When this option is active, CintaNotes tracks user activity; after the specified period of the user not being active in the program, it will automatically minimize itself to the tray and lock the notebook.
The Lock immediately after minimizing to tray option allows you to manually lock the notebook simply by minimizing the application to the tray.
Please be aware that the notebook is automatically locked when the workstation is locked, so to lock the notebook you can also press Win+L.
Changing the Password
To change the password after it has been set, go to the same File / Password Protection window and click on the “Change Password” button.

The panel with the “New password” and “Confirm password” edit fields will appear. Enter the new password into them, then click on OK and re-enter the old password. After that the notebook will be re-encrypted with the new password.
Removing the Password
To remove the password and decrypt the current notebook, simply uncheck the “Protect this notebook with a password” checkbox in the “Password Protection” window. After clicking OK and entering the password for the last time, the notebook will be decrypted.